Showing posts with label trends. Show all posts

Thursday, October 6, 2016

Trendspotter: Chokers


As you have probably noticed by now, choker necklaces have made a big style come-back recently! When the choker trend first re-emerged last year I was skeptical. It brought back serious memories of my elementary school days and the rainbow stretchy chokers that were so popular back then. But, like most trends, I just had to find the right fit for my personal style, and now I'm totally on board. By now chokers are a huge style favorite seen on all the top bloggers and stylists as well as trendy girls everywhere!

My first choker purchase was this bold collar-style necklace (which I styled 3 ways here) which adds an edgy yet whimsical touch to a modern outfit. From there I tried out more delicate chokers, which have become my go-to pieces to keep my outfits on trend. From a simple gold chain with tiny rhinestones, to a double layer chain and cord (which I wore here, here and here), these style are delicate options that provide just a touch of edgy to your look. I also got one with a small round charm engraved with my initial "c" which I love because it is simple and delicate, and it is also adjustable to sit on my collar bone rather than being tight on my neck. 


I also like that I can layer with chokers and add another longer necklace to the mix as well. Below, I've found a few photos of some of my favorite looks for inspiration styling a choker necklace. 

This is just the tip of the iceberg, with more 90's trends recirculating into the fashion world in upcoming seasons, as seen at the recent New York and London Fashion Weeks. We are already seeing the return of velvet and velour styles on shelves, as well as throwbacks like embroidered jeans.
Are you a fan of 90's trends returning?

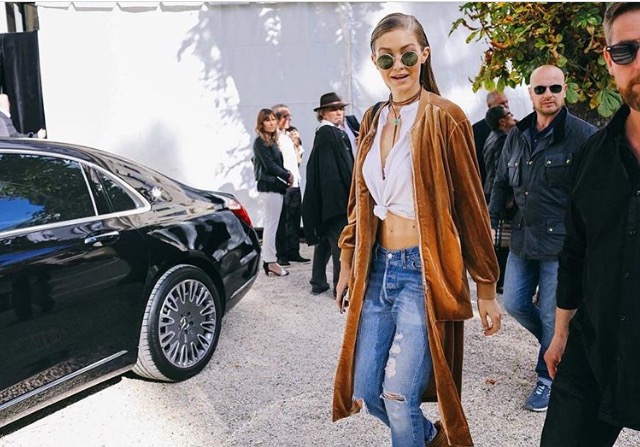
Check out some of my favorite bloggers and celebs rocking chokers:

Gigi Hadid. Image from instagram @ladyshadybo

happilygrey.com

theblondesalad.com

happilygrey.com

xoxo, CC

Monday, March 28, 2016

Aztec Tee


Remember a few years ago when 'aztec' prints were all the rage? Styles that are so trendy can feel a little passé after a few years, so what do we do with those pieces now? 
I decided to update my aztec tee by pairing it with distressed jeans and a leather jacket. This edgier vibe felt fresh and fun. With the tee partially hidden under the jacket the print becomes an more integrated aspect of the outfit instead of a bold in-your-face trend. I'll be honest, I mostly wear this tee just around the house, so it was nice to be able to incorporate it into a put-together look that felt both interesting and cool. Since the look is primarily black and white I brought out my baby blue clutch to add a little color. 


Tee: ModCloth (old). Jacket: Zara. Jeans: H&M. Booties: Steve Madden. Clutch: Rebecca Minkoff (similar). 


xoxo CC

Monday, January 18, 2016

Manicure Monday


I just tried a new nail art look on my nails, and I'm dying to share it with you all!
 This look is inspired by nail designs spotted on the New York Fashion Week runway with a graffiti/abstract brushstroke print. I created this look using a dark navy base with white and metallic silver detail. I think it came out pretty well considering that this is my first attempt! I based my idea off of this tutorial from Cosmo, but I decided to change the color palette and create the look without actually reading the instructions. So daring of me, right? lol 


Here's a step-by-step to get the look (if you do feel like reading instructions):

1. After applying a clear basecoat to protect your nails from turning blue (definitely a necessary step when using a dark color!), paint your nails with the navy nail polish and let dry. 
2. Taking the white nail polish, dab most of the polish off of the brush so that the brush is nearly dry.  Using the nearly dry brush create a few swipes across each nail in a few directions. This will create the rough brushstroke look.
3. Repeat step two using the silver nail polish. Let dry.
4. Look over your nails for any spots that need filling in, but be sure to leave some of the navy showing through as well. Touch up any spots that need it and let dry. Clean up around the edges and cuticles with a polish-remover soaked q-tip.
5. Apply a clear topcoat to seal it all in (I recently started using the Deborah Lippman Addicted to Speed and love it -- it dries so fast), and you're done! 

So easy! What do you think of the look? I think next time I would try to do fewer wider brushstrokes for a cleaner look. 


xoxo CC