Showing posts with label beauty. Show all posts

Monday, August 7, 2017

Back to Blonde


Hello and happy summer! Last month I decided to change up my hair a bit, and went back to blonde just in time for the height of summer! I had let my highlights grow out for the past two years so my hair had been looking pretty dark with a slight ombre fade from my natural darker color on top to a lighter blondish color at the tips. After trying out my natural hair color for a while I was feeling ready to get back to a brighter blonde shade that I'm more familiar with, since I've kept my hair blonde for most of my life. I also can't believe how long my hair had gotten! I tried to keep some of the length but had the stylist trim up the damaged ends a bit for a smoother look. Anyway I wanted to share a little before and after pic of the results! 
My natural darker shade still peeks through for a textured effect, but the addition of light highlights is summery and fun. The change looks subtle here but as the highlights have matured I am feeling great as a blonde again.
Top: Loft. Bag: Rebecca Minkoff.

 Before:


After:


xoxo, CC

Monday, May 22, 2017

Tips for the Best At Home Manicure


I've been doing my own nails for just about as long as I can remember. While it can be a fun and relaxing experience to get a mani/pedi at the salon with girl friends, I more often than not still do my own nails at home. It saves (tons of) money and comes out just as well with few simple tricks that I've learned over the years. The years of practice have lent me a steadier hand, but just knowing these few tips can make all the difference to get that professional and flawless look we all want to achieve. 

So let's dive right it. Sometimes I start with a base coat, and sometimes I don't bother. But if my nails are feeling weak and chipped I'll often do a base layer of this Nailtiques protein treatment to help my nails stay healthy and strong even while painted. Especially if I'm working with a dark color that I don't want to stain my nails, a base coat can be a great place to start.


Next comes the color. Today I'm using an Essie color I've been loving this spring called "Lady Like" which is a gorgeous muted dusty pink. It has tones of lavender and works as a lovely almost-nude that goes with everything. I always apply two coats of color to make sure each nail is evenly covered. I start with a swipe of the saturated brush up the center of the nail, and then gently spread the color up each side of the nail starting from the bottom with every stroke and making sure to evenly cover the tip of the nail. I've learned that you only need a minute or two to let one layer dry before applying the second coat.

But here's the trick I use: don't paint your thumbnails until the very end. That way, after each coat applied to your other nails you can run your thumbnail around the edge of the cuticle to remove any excess polish that has gotten onto the skin. leaving the thumbnails bare until the others are all done allows you to ensure that all of those nails are flawlessly painted with no excess color spilling over onto the skin. Because let's be real, no matter how steady your hand is you're bound to get some polish on the skin. I learned this trick by watching the ladies at the salon, who tend to use one of their own finger nails to clean polish from your cuticles as they paint, and it works like a charm. I've tried other tricks like using a polish-remover soaked q-tip to clean the cuticles, but nothing works quite as well as using a bare nail to clean up as you go.


But then, what of those unpainted thumb nails? Well, they're not forgotten. Since I'm right handed I tend to be steadier when painting with my right hand -- so I start with my weaker side and use my left hand to paint the first thumbnail. This way I can still clean the edges with the last bare nail if my weaker hand makes any mistakes. After two coats have been applied it's time for the final nail to be painted. Since I'll be using my stronger right hand at this point to paint it, chances are I can get it pretty clean and accurate on the first try. But, if I do mess up, I like to use the tip of a metal nail file to scrape away any polish from the cuticles and skin. 

The last step: a clear top coat. This is essential to prolong your manicure and prevent immediate chipping. With a top coat I can get through at least a full week with fresh-looking nails as long as I let them dry properly after painting. Recently I've been using Essie's Super Duper top coat, and I really like it. I also previously used a Deborah Lippmann "Addicted to Speed" top coat that I loved until it started to get dried out and sticky after only a few short months which was really disappointing. Either way, a top coat is necessary to keep your mani looking fresh longer, and it also adds a smooth shiny finish to your nails. As much as it may seem like an annoying extra step, don't skip it! Without a topcoat your nails will be chipping within a day or two. 

So there you have it, my process for getting salon-quality nails at home. With these few tips that I've learned over time I'm now able to produce a flawless home mani easily. No more messy nails! And no need for expensive salon appointments! Cheers to that, ladies. 


xoxo, CC

Tuesday, March 21, 2017

5 Best Beauty Finds


Recently I've discovered a few new beauty products that I can't get enough of. I wanted to share my recommendations since I always love to hear other people's opinions when trying to navigate the endless options of beauty products out there these days. These are a few products I've been using pretty much every day and only wish I had found sooner! 


The first of these finds is the Smashbox under eye primer, which I feel like I can't live with out ever since I discovered it! I first got a sample size of this from Sephora with my beauty insider rewards, and it's the best thing I've ever discovered unexpectedly. I don't know what magic is in it, but it really helps to minimize under eye dark circles and puffiness. The gel is very sheer with a slight shimmer to it that is imperceptible once it's on your skin, but certainly helps you to look more awake and under eye circles less dramatic. Even on days when I don't bother with makeup, I will usually swipe a little bit of this under my eyes to make my face look more awake and presentable.


This bareMinerals tinted hydrating gel was an impulse buy when I needed to spend a few more dollars to unlock a promo, and I don't regret it one bit. It's a great back up to have on hand for days when you don't want to put on a full face of makeup, but want to even out your skin tone a bit and add a touch of color. The shade I grabbed is probably a little darker than would be recommended for me, but it goes on pretty sheer while still delivering noticeable results for a tanned look. I've used it under my regular makeup for a touch of hydrating color, and on it's own for more casual days.


A few months back I picked up this Lancome blush to replace my favorite bareMinerals one that I talked about here last summer. I wrote about just how much I loved my favorite hot pink blush from bareMinerals, but unfortunately it was a limited edition color so when I ran out I had to find something else to replace it! After testing just about every bright pink blush in Sephora I found this gorgeous shade from Lancome. It is very similar to the Bare Minerals one I had loved for years, so I am happy to have found something that I love just as much. Something about the hot pink shade adds a glowing touch to my makeup look that soft pinks and red tones just don't achieve. I love that it makes my face look awake and adds a bit of color while still looking natural. Believe me, it's not so shocking on as it my seem!


For some reason I have the hardest time finding lipsticks that stay. Even ones recommended for their lasting quality don't seem to work on me, they fade or rub off within an hour. This Makeup For Ever Artist Lip Blush is the first red lip color I've found that actually stays in place over a long period of time without fading or rubbing off! For some reason they only make it in one color (come on Makeup For Ever, let's get on this in every shade of the rainbow!) but it's a great bright cherry red color that is perfect for a touch of drama. I seriously have never found anything else that compares in lasting time, and I couldn't be happier with how this one wears. Definitely worth a try if you're looking for a lasting red lip! (and who wouldn't be?)


I picked up this No. 7 foundation on a (genuine, non-paid) recommendation I read from one of my favorite bloggers, and I really like it! It was recommended as an all-day lasting foundation with medium coverage and a smooth no-show appearance, which is exactly what I was looking for as a beginner to liquid foundations. (I previously used bareMinerals powder foundations for years, and still switch between the two sometimes). I love that this foundation goes on easily just applying with my fingers, and doesn't leave streaks or obvious lines. As always it's important to blend at the jawline, but I find that in general this formula goes on easily and doesn't look too obvious. I always like a natural looking makeup look that's not cakey, and this one does the job. The color I got is called "cool vanilla" and is the only light yet not pale shade with a blue undertone. I was nervous to buy it without getting to try out a tester, but the color is actually perfect for me and really evens out my skin for a soft and flawless look.

Any must have makeup finds or recommendations? Let me know! I always like to hear what other people swear by so maybe I can try it myself!

xoxo, CC

Thursday, February 25, 2016

Loving Lately: "It's Still Winter" Essentials


I haven't had a lot of time for reading lately, but I love to flip through the Kate Spade All in Good Taste book when I have a few moments to read a few pages and get some inspiration. It makes me want to host a killer dinner party SO bad, but unfortunately that's not in the budget anytime soon. However, the book is full of good advice and makes a great source of inspiration. I'm taking tips from it that I can adapt for the next low-budget party my roommates and I host.


The Naked Basics eyeshadow palette by Urban Decay. I had been on a long search for a good neutral eyeshadow for those days that I don't want to look like I'm wearing a lot of makeup but I still want to smooth out my eyelids and cover up any redness. This palette is just what I was looking for. With a range of shades I can create a great ombre effect if I feel like getting fancy, or just swipe one of the lighter colors across my lids when I'm in a rush. Walk of Shame and Naked 2 are my favorites for a nude look.


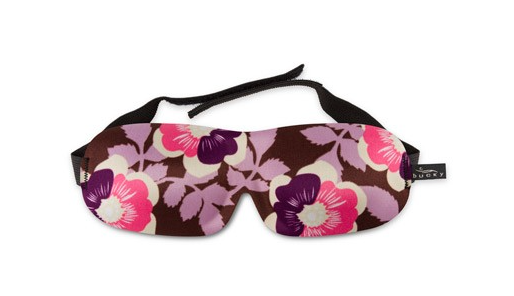
Sleep mask - the 40 Blinks sleep mask by Bucky. Need some beauty sleep? Me too. I'm not a city girl by nature so getting used to sleeping with street light coming in through the widows is tough. I love this sleep mask because it is comfortable to wear and provides room for your eyelashes to blink without hitting against the mask. It comes in a few cute prints and is reasonably priced, but the only downside is that you have to order a minimum of two. I use one for everyday and the other for travel, but you could also gift one to a bestie!


Coloring Books. Recently the popularity of  'grown up' coloring books has skyrocketed and it seems like everyone has one! I had to jump on that trend too, because who doesn't love to color? It is a great way to relax at the end of the day (a perfect way to unwind before bed without staring at a screen) or de-stress and let your creativity out. This is the one I have, called "Enchanted Forest"! I love how whimsical the images are, full of castles, critters, fairy homes, and toadstool-dotted landscapes.


Kusmi "Euphoria" Orange Chocolate tea. This tea is DELICIOUS! My mom and I discovered it on a trip to Montreal a few years back and have been looking for it ever since, but it is hard to find! If you're into herbal teas and interesting flavor combinations Kusmi (from Paris) has some really good options. The aroma of this orange chocolate is mouth-watering, and the taste really stands up too. Whenever it's cold in my apartment I like to warm up with a mug of tea, and this one has become one of my go-to's.


Mini wallet. While I love the aesthetic of a big zip wallet, sometimes it can feel like a lot to carry around. Recently I have been all about the convenience of a small folding wallet. It holds everything I need, fits easily in a small cross-body, and provides easy access to my metro card on my daily commute. I have this polkadot one from Kate Spade which seems to be sold out, but these are two similar options to the one I have 1/2.

What are your must-haves this winter? 

Monday, January 18, 2016

Manicure Monday


I just tried a new nail art look on my nails, and I'm dying to share it with you all!
 This look is inspired by nail designs spotted on the New York Fashion Week runway with a graffiti/abstract brushstroke print. I created this look using a dark navy base with white and metallic silver detail. I think it came out pretty well considering that this is my first attempt! I based my idea off of this tutorial from Cosmo, but I decided to change the color palette and create the look without actually reading the instructions. So daring of me, right? lol 


Here's a step-by-step to get the look (if you do feel like reading instructions):

1. After applying a clear basecoat to protect your nails from turning blue (definitely a necessary step when using a dark color!), paint your nails with the navy nail polish and let dry. 
2. Taking the white nail polish, dab most of the polish off of the brush so that the brush is nearly dry.  Using the nearly dry brush create a few swipes across each nail in a few directions. This will create the rough brushstroke look.
3. Repeat step two using the silver nail polish. Let dry.
4. Look over your nails for any spots that need filling in, but be sure to leave some of the navy showing through as well. Touch up any spots that need it and let dry. Clean up around the edges and cuticles with a polish-remover soaked q-tip.
5. Apply a clear topcoat to seal it all in (I recently started using the Deborah Lippman Addicted to Speed and love it -- it dries so fast), and you're done! 

So easy! What do you think of the look? I think next time I would try to do fewer wider brushstrokes for a cleaner look. 


xoxo CC

Monday, November 23, 2015

Frog Prince - Review


By no means would I consider myself any sort of expert when it comes to makeup: au contraire. While I have my daily makeup routine that I love (mostly BareMinerals btw) I know I still have a lot to learn. But, when I discover something new and interesting, like this Frog Prince lipstick by Lipstick Queen, I of course have to share it with my readers! 

My mom actually introduced me to this fascinating lipstick when she gifted it to me on my birthday! I had my gift waiting patiently in its wrapping for my birthday morning so I could open it before I left to catch a plane to California. It is always nice to have a little something special to mark the day even if you can't fully celebrate that day (sitting on a plane all day in my case). Anyway, I'll be honest I was a bit confused when I opened it and found a lipstick in a deep green shade. As it turns out, this intriguing lipstick goes on clear and changes automatically to your best natural lip shade. Using the pH in your skin as a guide it shifts to a shade that compliments your skin tone. I thought that was such a fun idea, not to mention totally useful! No more having to hope a shade will work on you, because you know this one will! On me it turns to a soft sheer reddish-pink, just enough punch of color while still looking natural. It is the perfect color to wear during the day or for a casual event that just needs a touch of something special. 

I love that they went with such a fun whimsical theme calling it "Frog Prince" alluding to its changing qualities and 'perfect match' characteristics, and then shaded it in a froggy green! The box is  just so cute too with a castle scene and lounging frog on the side. Overall, I am really enjoying this color as a great everyday lip shade to brighten up any look. I definitely recommend giving it a try!


Lipstick: $25 at Lipstick Queen/Ulta/Nordstrom. Top: Anthropologie (1/2/3). Necklace: kate spade. Earrings: Gorjana.


xoxo CC

p.s. I've added a new tab called "Student Work" where I am sharing some of the project assignments for the Teen Vogue x Parsons classes I am taking. Check it out if you're interested to see what I'm doing! 

Monday, June 8, 2015

The 4 Best Colors for Your Toes


Last summer I discovered the perfect summer toe nail polish color, You're Such A Budapest by OPI. I've been obsessed with it ever since and was psyched a few months ago to finally find it for sale in a drugstore! (so of course I bought a bottle so I can do them at home) 
It is finally the time of year to use it again, and I'm so excited. The soft lilac has cool tones which make it perfectly relaxed and not too cutesy-pastel. The shade of the color also changes in different lighting, making it more blue or grey or purple so it never gets boring! 


In the colder months I usually stick to deep magenta and pinkish reds, of which OPI's Ate Berries in the Canaries and Paint My Moji-Toes Red are my respective favorites.

But once the weather gets nice I like to turn to more unique colors. My other warm weather essential color is Essie Turquoise and Caicos because it is a great soft hue that is so easy to wear on your feet but totally summery and fresh too. This color looks great on almost everyone, so it's definitely one to check out!

What colors do you swear by? 


xoxo CC

Monday, April 27, 2015

Loving Lately: April Faves

Recently I've been loving:
Unbreakable Kimmy Schmidt. So funny. I just finished watching the whole first season, and it's so good in a ridiculous and goofy way. It's weird for sure, but it's a great show when you need a little pick-me-up and a few laughs. I can't wait for the next season already!


Rompers. Something I never quite got on board with last summer, they've finally creeped their way into my wardrobe, and I don't hate it. I love the long sleeved flowy style of the Yumi Kim Liz Romper, which has such a flattering fit and a great selection of bright prints! (I know, I know, I've already talked about this one a few times...)

(original post here)

Trader Joe's frozen Scallion Pancakes. They're so good. Since I'd never had a TJ's to shop at until I moved to the city, I just discovered these delicious Pa jeon recently. I usually cook these according to the frying pan instructions along with some stir fried veggies and rice for a quick and yummy dinner.


Michael Kors perfume. My mom gave me a sample size of this perfume in my Christmas stocking, and I have fallen in love with it. It is the perfect day-to-night scent, not too sultry for daytime, but neither too soft or floral for a night out. 


Layering delicate necklaces. Like these ones from BaubleBar, Kate Spade, and Dogeared that I wear all the time. I love to layer two of them together or pair one with a long necklace for a twist. It makes a great simple statement!
More options: at BaubleBar and Gorjana

(original post here)

See some of my past Faves lists from October and January

xoxo, CC

Thursday, November 6, 2014

Feelin' 25


I celebrated turning 25 over the weekend! For festivities I had some friends over to my apartment for a little party and I treated myself to a little shopping too. I don't know how this always happens, but somehow I didn't end up taking any pictures with my friends that night! So I snapped a few later to recap this quarter-century celebration. 

For my party I cooked up some delicious snacks including guacamole, bacon-fat popcorn, and cupcakes with chocolate ganache frosting. I wore a pretty blue cutout dress that has been in my closet for quite a while waiting for an occasion to call its name. I complimented it with gold eyeshadow to match my gold nails, pink lips, and a wristful of armcandy. 

On my actual birthday I took myself on a little shopping trip to H&M and to Kate Spade to get these super fun glitter Keds. How cute are these, though? After trying several brands of cute little sneakers such as Superga and Gola, I've concluded that Keds are by far the most comfortable for my feet. So, when they make a Kate Spade glitter version, how could I not get them? And then, my lovely roommate got me a pair of Kate Spade earrings too! All in all it was a good birthday, and I am excited for this next year! 


Dress: Isle of You boutique (similar, similar). Glitter sneakers: Keds for Kate Spade. Earrings: Kate Spade (similar)
Gold eyeshadow: Bare Minerals "true gold." Blush: Bare Minerals "charm." Lipstick: NYC "Blossom."


"I don't know about you but I'm feelin' twenty(five)"
-T Swift (and me)

xoxo, CC